
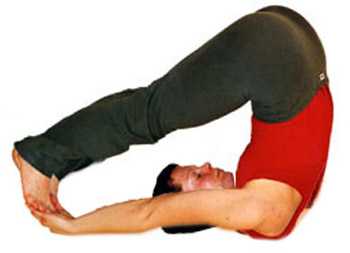
Halasana
«Halasana», the Plough Posture, also simply called «Plough», is an Asana (body posture) from Hatha Yoga, which belongs to the 84 Main Asanas and is the 3rd Asana of the 12 Basic Postures of the Yoga Vidya series. «Halasana» is a wonderful Asana for stretching the back and cervical spine and thus provides more flexibility. The «Plough», «Halasana», helps to achieve more calmness and stands for initiating changes and patiently waiting for the effects. The «Halasana» follows after the «Sarvangasana», the «Shoulderstand», and the opposite position to «Halasana», the «Plough», is «Matsyasana», the «Fish». Learn more about the Yoga Asana «Plough» and what symbolic meaning the word «Halasana» can have.
 «Halasana»
Table of Contents
1.1 Step by Step Instructions for Halasana out from the Shoulderstand
2 Advanced Variation — the Lotus Plough
3 Effects of Halasana
3.1 Physical Effects of Halasana
3.1.1 Stretched Muscles
3.2 Mental Effect of Halasana
3.3 Energetic Effect of Halasana
3.3.1 Chakras specifically addressed
4 Sukadev about Halasana
5 Swami Sivananda about Halasana
5.1 Method
5.2 Benefit
5.3 Utthana Padasana
6 More gentle Variations of Halasana
6.1 For Back Problems
6.2 Karna Pidasan — Ear-Knee Position
6.3 The Supported Shoulderstand
6.4 Halasana with Blanket as an Aid
7 Contraindications for Halasana
Instruction for Halasana
«Halasana» (the «Plough») is an excellent stretching exercise for the entire spine. It focuses especially on the neck and shoulder area. From the «Shoulderstand» or «Sarvangasana» you bring, with the exhalation, both feet behind you to the floor. When your feet touch the floor, you lay your hands on the floor behind your back. If your feet are not touching the floor, you hold your hands behind your back to support them. Keep breathing while you are in «Halasana». When you want to come out of the position, roll you out slowly, place each vertebra one by one, thereby keeping your hands on the floor. Always try to come out of the «Halasana» position slowly and with full body control.
If you suffer from kyphosis of the spine, do not force yourself into the position; always go as far as is agreeable for you.
Step by Step Instructions for Halasana out from the Shoulderstand
(1) You are in «Sarvangasana», the «Shoulderstand».
(2) With the next exhalation bring one foot behind your head to the floor and with the next inhalation bring it straightened up again.
(3) Repeat this with the other foot.
(4) Now with the next exhalation bring both feet to the floor or one leg after the other, which is gentler for the back.
(5) Classically both legs are now straightened.
(6) When your feet touch the floor, release your hands from your back and bring them to the floor interlocked.
(7) If your feet are not touching the floor, you can place a cushion to support your feet before you do so.
(8) Actively push your buttocks upwards to straighten your back.
(9) To reinforce this, you can press your shoulders and toes into the floor.
(10) Walk with your toes towards you to intensify the stretching on the back of your legs.
Leave Halasana: To leave «Halasana», the «Plough», lift your legs a little, use your hands and arms as a brake on the floor, support yourself with your abdominal muscles and roll yourself out of position vertebra by vertebra. Now trace in «Shavasana».
 |
 |
Advanced Variation — the Lotus Plough
(1) You are in «Sarvangasana», the «Shoulderstand».
(2) Remove one arm from your back and bring one leg into the Half Lotus.
(3) Now release your other arm from your back and help yourself into the Full Lotus.
(4) Bend your legs towards your head to shift your weight so that you can release both arms from your back.
(5) Now bring your arms above your head to the floor to slow down yourself.
(6) With the next exhalation, bring your knees next to your shoulders.
(7) When your knees touch the floor, grasp your body with your hands to form a package.
(8) If your knees are not touching the floor, you can place them on your forehead or on a cushion.
(9) Actively push your buttocks upwards to straighten up your back.
(10) To reinforce this, you can press your shoulders and toes into the floor.
Leave the Lotus Plough: To leave the «Lotus Plough», come into the «Shoulderstand» again, dissolve the Lotus there and come out of the «Shoulderstand» as usual or as described under «Leaving Halasana» from «Halasana», the classical «Plough», into «Shavasana». Now trace the «Lotus Plough».
Effects of Halasana
Physical Effects of Halasana
«Halasana» greatly improves the flexibility in your cervical area, especially your neck, upper back and shoulders become more flexible. The «Plough», «Halasana», thus helps to release the tensions in the neck and shoulder area. «Halasana» gives a gentle stretch for your entire spine. «Halasana» also stretches the leg muscles. The thyroid gland function is normalized and the abdominal organs receive a gentle massage. The Yogis say that you are as old as your spine. The regular practice of «Halasana» thus slows down the aging process considerably.
Stretched Muscles
➳Longissimus (back extensor)
➳Trapezius (hooded muscle)
➳Neck Muscles
➳Gluteus (gluteus muscles)
➳Biceps (thigh flexor)
➳Gastrocnemius (calf muscles)
Mental Effect of Halasana
«Halasana» helps to get to the inner center. «Halasana» gives the power to initiate long-term changes («to cultivate your field») and to patiently wait for the effects. If you suffer from insomnia, regular practice of «Halasana» will help you to reduce your sleepless periods. You will probably notice that your mind will become calmer and much clearer.
The energetic effect of Halasana
«Halasana» has a harmonizing and balancing effect.
Chakras specifically addressed
➳Vishuddha
➳Anahata
|
|
Sukadev about Halasana
|
|
Swami Sivananda about Halasana
Method
When this Asana is practiced, it appears as a direct image of a Plow. Hala means Plough in Sanskrit. Spread a cloth on the floor. Lie flat on your back. Keep both hands on the floor at your sides, palms facing to the ground. Extend both legs. Raise them very slowly. Do not bend them. Do not raise your hands. Do not bend your torso. Form an obtuse angle. Then lower your legs very slowly. Put them behind your head until your toes touch the ground. Keep your knees as straight as possible and very close together. Legs and thighs must be in a straight line. Press your chin against the chest. Breathe slowly in and out through the nose. Not through the mouth.
There is another variation to perform this Asana. After the above posture is finished, slowly bring your hands into the position where you can grasp your toes. This is also the better method. When you come out of the Asana, slowly lift your legs and bring them into the Starting Position where you are lying flat on the floor.
Benefit
This Asana stimulates the nerves in the spine, the back muscles, the bones of the spine, as well as the sympathetic nervous system that runs along the spine. This Asana complements and reinforces the «Sarvangasana». A large amount of blood flows into the nerves of the spine, the sympathetic ganglia, the nerves located in the sympathetic nervous system, and the back muscles. In this way, everything is optimally supplied.
The spine is very sensitive and flexible. This Asana protects against premature hardening of the spinal bones. The ossification is a fast degenerative process of the bones. The aging process is often fed by this early hardening of the bones (osteoporosis). In this degenerative process the bones become hard and brittle. Those who practice «Halasana» are very mobile, agile and energetic. The back muscles are alternately contracted, relaxed, pulled and stretched. In this way the versatile movements ensure a good blood flow and everything is well supplied. Various types of muscle pain (muscular rheumatism), lumbago, sprains and neuralgia (nerve pain) are cured by this Asana.
The spine becomes soft and elastic. It is twisted and rolled up as if it were a piece of linen. Someone who practices «Halasana» will never get lazy. The spine is a very important structure. It supports and holds the whole body. It consists of the spinal cord, the spinal nerves and the sympathetic nervous system. In Hatha Yoga the spine is called Meru Danda (in Sanskrit Meru is the mountain of the universe, the center; Danda (m.) means stick).
For this reason it is your task to keep the spine healthy, strong and supple by practicing «Halasana». The muscles of the abdomen, the rectal muscles and the muscles of the thighs will be tightened and supplied through that. The tendency to obesity or corpulence or chronic constipation, tumor formation, congestion and enlargement of the liver and spleen, can be cured by this Asana.
Utthana Padasana
Lie down. Legs are straightened; hands are to the sides, palms pointing to the floor. Lift both legs together from the floor for about 60 cm without bending legs or knees. Lower them slowly. Repeat this six times. Intestinal sluggishness, pain in the hips and thighs will disappear. This is a Preliminary Exercise to «Sarvangasana».
More gentle Variations of Halasana
For Back Problems
First of all, you bring a chair behind your head in position. You lie on your back and come into the «Shoulderstand». Now, instead of bringing your legs out of «Sarvangasana» all the way down to the floor, place the closed and straightened legs on the chair behind your head. This way you take unnecessary pull out from your lower back. Especially if you have back problems you can now relax better into the position and experience all the effects of this wonderful Asana. It is not important how far you get into the Asana. What is much more important is that you can assume a position in a relaxed way, especially if it has a more passive or «Yin» character. Yoga should bring joy and not new suffering.
Karna Pidasan — Ear-Knee Position
«Karna Pidasan» is best translated as «Ear-Knee Position». You are in the «Shoulderstand». From here you bring your knees, if possible on your forehead, the legs remain closed, the knees are bent.
The Supported Shoulderstand
You lie relaxed on your back. With the inhalation lift your hips and place a pillow under the sacrum, if comfortable, also under the lumbar or thoracic spine. Through these positioning possibilities alone, realize how important it is to feel and know your own body. Go playfully and not doggedly to the thing. Relax your jaw joints. Now lift both legs with bent knees, straighten your legs upwards. Breathe deeply, preferably in the Uddjai Breathing.
Halasana with Blanket as an Aid
Place a blanket under the shoulders and elbows so that the head and neck are lower. In the «Plough» you can think of a project you would like to tackle soon. The «Plough» prepares the ground in you for new projects so that they can flourish.
Contraindications for Halasana
For neck problems and severe thyroid problems, the «Plough» should only be done after consultation with a Yoga teacher, doctor or alternative practitioner. In case of doubt, it is better to leave it out for the time being and replace it with other Asanas. The «Plough» is indeed helpful for many types of neck and thyroid problems. However, the individual case must be considered. Some people with retinal detachments, eye diseases, serious heart problems and severe high blood pressure may not be allowed to do «Reverse Positions». People with lower back problems should do one of the gentle variations.
